Create Screencasts in Canva
Canva, the design tool that’s free for educators, has a built-in screen recording tool.
Screencasts
Screencasts are a great way to present information to your students, and there are a plethora of options to use to create them. The idea is to record what’s on your screen while you narrate what you are doing. The recording can include a inset shot of you from your webcam, which students like.
Recording a screencast in Canva
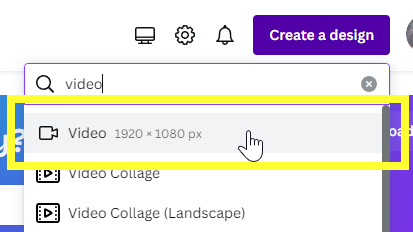
Unfortunately, it’s not as easy to start recording a screencast in Canva as it is in something like Screencastify. To get started, click on Create a design in the upper right corner and select Video (you may have to search for it):
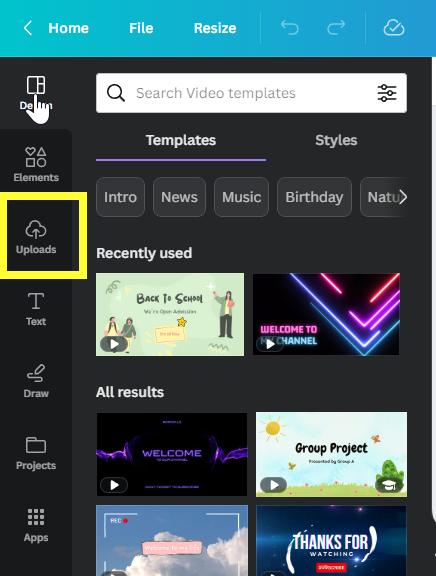
You’ll be greeted with a blank canvas. To get to the screen recording tools, click on Uploads on the left side:
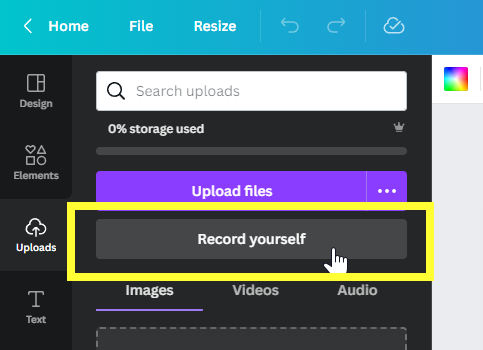
Underneath the Upload files button is a button that says Record yourself. Click it.
(At this point, you may be asked several questions about giving access to your camera and microphone to the browser. If you deny this access you won’t be able to record yourself, so I would recommend allowing access).
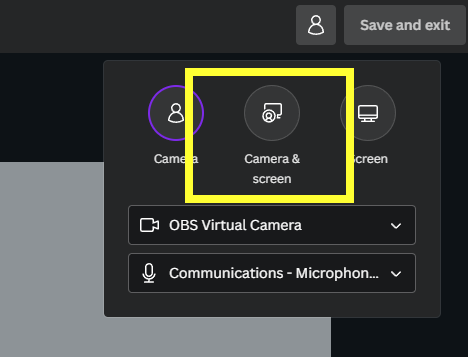
In the upper right you can select what you want to record: camera, camera & screen, or screen. Which one of these you would like to use depends on your use case, but today we’re going to look at camera & screen. Click on that icon:
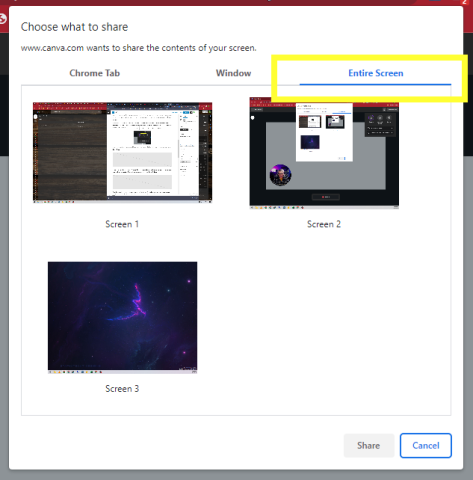
Your browser will ask what you want to record. If you are just starting out, I would recommend selecting Entire Screen:
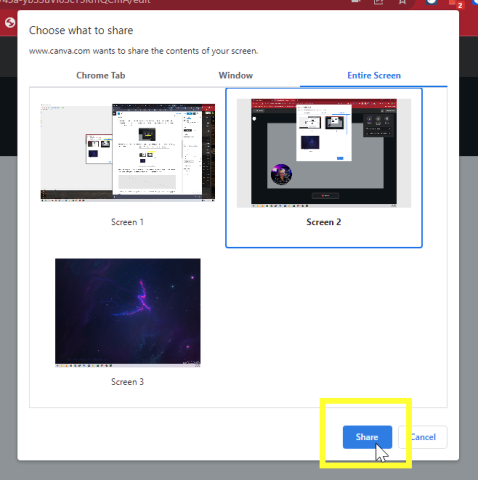
If you have multiple monitors, you’ll select the one you want to record. Chances are you only have one so you’ll only see one option. Click on the preferred screen to record and hit Share:
From here you’ll probably get a great example of the Droste effect, where your screen recursively appears smaller and smaller. Don’t worry about it, once we start recording we’re going to minimize this window so that effect won’t be in the final product.
Click Hide on the box at the bottom of the screen so it isn’t in your final product:

Now, click record! You’ll get a countdown, and the screen will then start recording. While the countdown is taking place, you can minimize your Canva window. When you are finished, maximize your Canva window and click the Done button. Review your video, and if you’re happy with it, click Save and exit in the upper right corner.
Your screen cast is now in the timeline and you can use the Canva video editing tools to crop the video, move around the webcam, or overlay other elements on the screen cast. For example, the webcam video defaults to something pretty big, you can resize it.
Screencasting tips
Here are some of the things I do when creating screencasts:
- Try to minimize takes: I usually record the entire sequence as one long video. Then I’ll go in and split the slip and crop it. For example, if I mess up what I said, I start over with that sentence. Then in editing I’ll split and crop out the mess up. This usually puts a little glitch in the webcam video portion, but people are used to that.
- Rehearse what your going to do: Go through the steps a couple of time to make sure there are no surprises.
- Keep it short and sweet: No one wants a minute or two of dialogue before you get to the good stuff.